Refer to the following topics for more information:
•Apply a Prepayment to an Account
•Adjust Funds and Issue Refunds
You can create accounts using one of the following methods:
•Typically, you will NOT manually add students. It is always best to import students rather than manually add to avoid inadvertent duplication. If a student is eligible for a reimbursable meal and is not yet in the software, use the NO ID reimbursable meal feature on the POS Sales screen to enter a sale for the student.
•Teacher and Adult records are often manually entered.
To prevent duplicates, only add adults at the Central Office.
Make sure that you select the appropriate Eligibility when creating the record.
Use the following steps to manually create student and adult accounts.
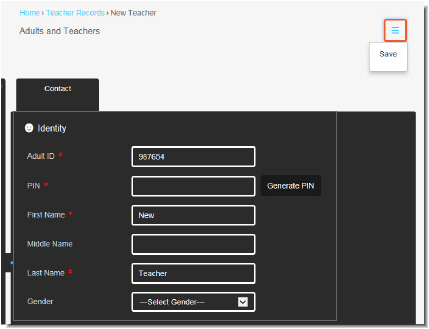
1.Go to Community > Adults and Teachers.
2.Click the Action button and select New Teacher.
3.Enter the required fields (*).
4.Click Save.
2Verify that the import file matches the originally configured template BEFORE you complete these steps.
Integration maps are typically created with the assistance of Horizon Engineers.
1.Log into HorizonSolana.com. Select Central Office as the school.
2.Go to Admin > Integration.
3.In the Quick Access pane, select the job from the left hand menu.
4.Click the Save multiaction button, and select Launch Job.
5.Locate the file for import and click open.
6.Click OK to finish.
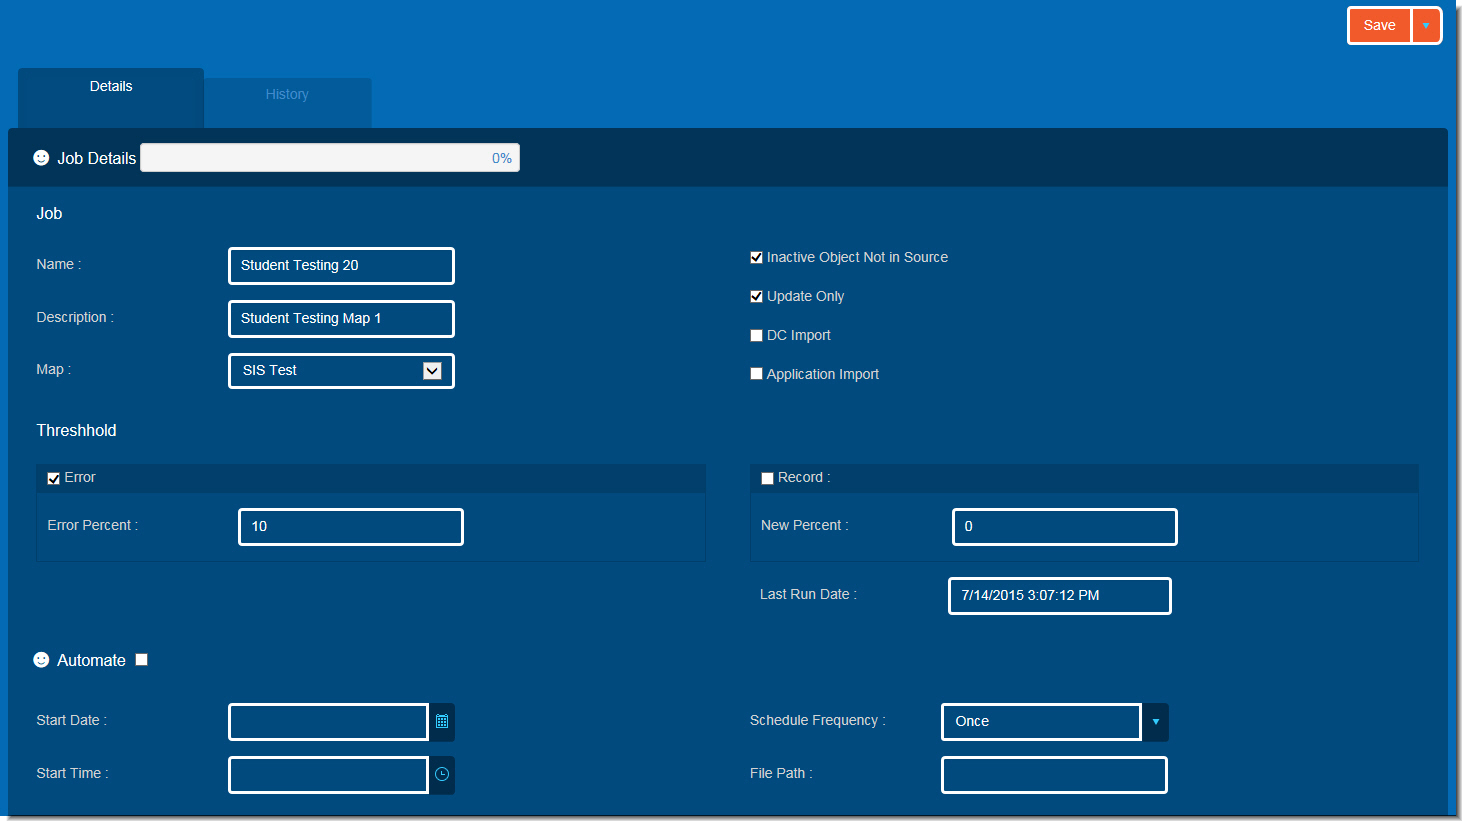
7.Click the History tab.
8.Verify that the import was run successfully.

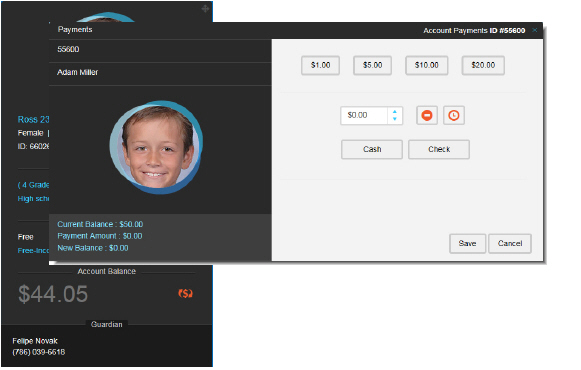
1.Go to Community > Student Records or Adults and Teachers.
2.Search for and double-click the customer.
3.In the Quick View panel, under Account Balance, click Adjust Funds.
4.Select a payment denomination or enter the Amount.
5.If a check was the form of payment, click check and enter a check number in the Check # field.
6.Select Save.
2The transactions that you perform in the web application will not affect your site’s tills.
1.Go to Community > Student Records or Adults and Teachers.
2.Search for and double-click the customer.
3.Click the Settings tab.
4.To block charges or set a charge limit, select Charging and enter an amount.
5.To block checks, select Block Check Sales.
6.Click Save.
Open a till before making any adjustments.
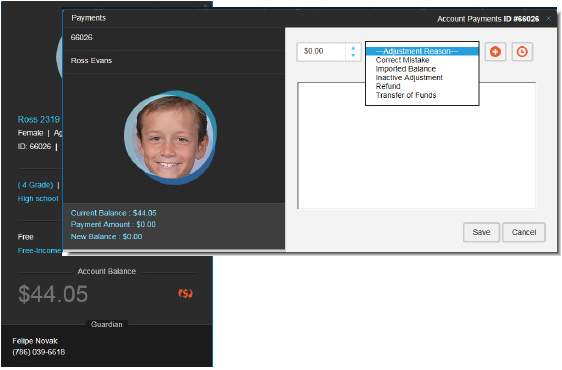
1.Go to Community > Student Records or Adults and Teachers.
2.Search for and double-click the customer.
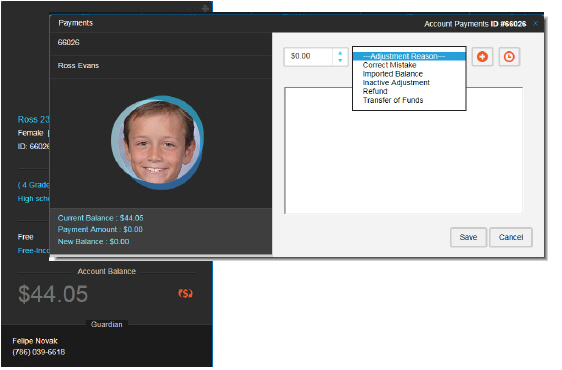
3.In the Quick View panel, under Account Balance, select Adjust Funds.
4.Select Make Adjustment.
5.Enter the Adjustment Amount. When subtracting from the account, enter the minus sign first amount (ex. -5.00).
6.Select the Adjustment Reason. For refunds select, Refund.
7.Enter your Comments.
8.Click Save.
9.Verify the account balance is correct. If not, void the transaction repeat the above steps.
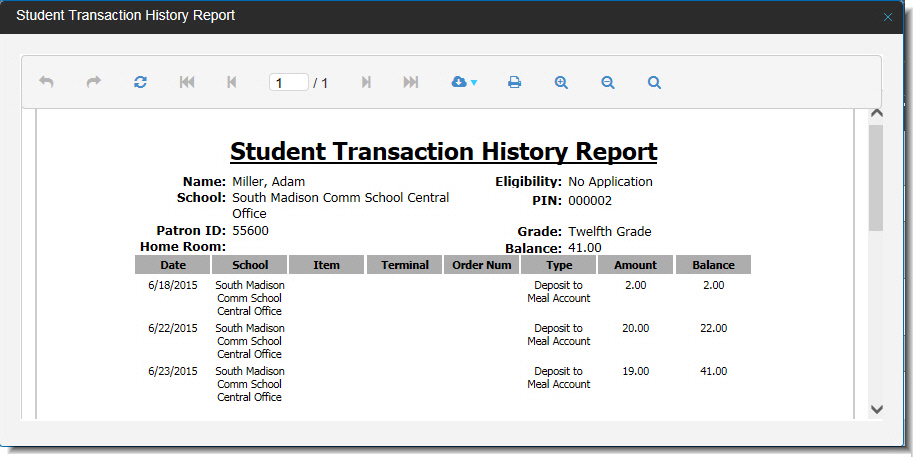
1.Go to Community > Student Records or Adults and Teachers.
2.Search for and double-click the customer.
3.In the Quick View panel, under Account Balance, click Adjust Funds.
4.Click View Transaction History to see the Transaction History report.
1.Go to Community > Student Records or Adults and Teachers.
2.Search for and double-click the customer.
3.Click the Settings tab.
4.Under Alerts, select Add new record.
5.Enter the following:
Alert—Enter the description.
Types-Select the alert type.
Expiration—Enter how long the alert is in effect.
6.Use the Action combo box to select Save.
Add allergens to a student’s record to make cashier’s aware of a student’s allergies.
1.Go to Community > Student Records or Adults and Teachers.
2.Search for and double-click the customer.
3.Click the Settings tab.
4.Click Allergens.
5.Select all of the student’s known allergens.
6.Use the Action combo box to select Save.
1.Go to Community > Student Records.
2.Search for and double-click the student.
3.Update the Primary Address information.
4.Click Save.
Photos provide an added layer of security to the POS system. Photos can help cashiers to quickly identify students and teachers to ensure the right person is being served.
2Uploading a large number (50+) of images at once may slow down your PC and lock up your Solana interface for the entire length of the upload. Initiate a large upload at the end of the day so it runs overnight.
1.Go to Community and select Student Records or Adults and Teachers.
2.Use the filters to locate the person’s record.
3.Double-click the record.
2If the Quick View pane is not displayed, click the Quick View tab.
4.On the Quick View pane, click Upload.
5.Select the file and click Open.
6.Click Save.
2If the file name matches the student ID, the photo will be automatically attached to the student’s record. Otherwise, the upload will be discarded.
1.Go to Admin > Definitions and Setup > Community > Import Customer Photos.
2.Click Import Photos.
3.Press Ctrl and click each photo that you want to import. To select all photos, press Ctrl+A.
4.Click Open.